Final Fantasy V Walkthrough
Written by Djibriel
Contributor
3.22: Interdimensional Rift; the Dimension Castle
Enemies: MithrlDrgn, MiniMage, Galacjelly, Mamon, Blind Wolf, A Rage, MagicDragon, Red Dragon, YellowDrgn, SwrdDancer, Death Claw, Fury, Yojimbo, Iron Giant, Ramuh, Azulmagia, Alte Roite, Jura Avis, Catastroph, Halycanos, Twin Tania
Treasures:  Thor's Hammer,
  Winged Shoes,
  Maneater,
  Prism Dress, Red Shoes
Blue Magic:  DoomClaw, L3 Flare, BlakShok, Guard Off, GobPunch, MindBlst, Aero3, Condemnd, Roulette, Aero, L2 Old, BlowFish, L5 Doom, L4 Qrtr, Guardian, Red Feast, LitlSong, Flash, ????, AquaRake, Aero2, Burn Ray, ToadSong, Missile, MagHammr, TimeSlip, WhitWind, Exploder
SwrdDancers are the graceful foot soldiers of whatever civilization was imprisoned together with the Dimension Castle. They can attack physically, use !High Kick (which is more powerful) and Danse Macabre, which sets Zombie to a single character.
Angel Rings help protect against this move (but  Ribbons won't), and note that any status ailment can work on them (including Toad, which just prevents the possibility of the enemy using Danse Macabre). SwrdDancers are Humanoids, not Heavy. You can nab some
  Enchanters from them, which are both sweet swords for your Blue Mages (if you don't plan on using !Attack at all) and the best enchantable blades for Sorcerors.
Death Claws use
DoomClaw all the freaking time. They're notable since they can't be Controlled, I guess. They are weak to Water and not Heavy, so those with Leviathan and Odin will have no trouble killing them. They have a rare  Thor's Hammer for you; you'll be able to find one in a chest here as well.
Iron Giants are the worst Giants. They attack with powerful physical swings from that grand blade, and they use Rocket Punch to deal 50% of a character's current HP in damage and set the
 Muddle status. When struck with an !Attack, a Iron Giant will counter with a powerful !Takedown. It goes without saying that this should be avoided: !Takedown is unblockable and ignores Defense, making it quite potent. They look very intimidating, but these Giants are vulnerable to Death and Petrify and are not Heavy, so take advantage of that fact rather than trying to plow through their 18000 HP.
Throw open the heavy doors and meet your destiny. Here, in the main hall, are seven exits. You appeared out of one. Another one is a staircase in the middle of the room going up, but the doors there are closed. Going around the staircase will lead you to the stairs going down to the basement, but we'll get there later. To the left, the visible the door leads to an otherwise featureless little room packed with spears you can't pick up. The other one takes you outside to a small tower. Here, in a chest, you can pick up a
Thor's Hammer, which is a bit less powerful than the Double Axe but Back Row OK and therefore better against random monster formations. It is also an Aerial weapon; you actually throw this thing around, much like the weapon of the comic book hero Thor. Or so I've been told, comics are for total geeks.Go back to the main hall. The visible door to the right will get you nowhere like the other one, so go outside. Another small tower houses a chest containing
Winged Shoes. Now go back to the main hall and circle around the staircase to find the stairs going down to the basement.There are no random encounters in the basement. There are quite a few NPCs running around here, though. To the left is Azulmagia, one of the Eleven of the Rift. To the right, Catastroph the beholder is holding a girl captive; Catastroph is another one of the Eleven, though apparently it loathes working together with Azulmagia (or the other way around). A total of six old men are locked away in their cells as well. What a mess.
You can engage the old men through the bars if you must. This way, you don't have to open the door and can nicely pick them off at your leisure.
Alte Roite  Boss Monster |
Type |
Level |
HP |
MP |
Gil |
EXP |
Speed |
Humanoid | 58 | 6000 | 1000 | 0 | 0 | 45 | |
Strength |
Attack Mult. |
Magic Atk. |
Evasion |
Defense |
Mag. Def. |
Mag. Evade |
|
45 | 20 | 5 | 70 | 45 | 60 | 5 | |
Stolen Items |
Dropped Items |
||||||
Common:  Healing Staff Healing Staff | |||||||
Command Immunities | Elemental Immunities | ||||||
Catch, Control | None | ||||||
Elemental Absorb | Elemental Weakness | ||||||
None | None | ||||||
Blue Magic | Status Immunities | ||||||
None |          | ||||||
Strategy | |||||||
Oh... my aching back!
Just because there's six of them doesn't mean they're not serious business. They'll attack physically, which isn't too bad, or use Encircle 33% of the time to remove a character from the fight. That's an issue, and you can't really stop it.
Bersrk works, but you don't want to set it due to the fact that, after defeating the old man, he transforms into the creature you're probably here for: the Jura Avis! If you set Bersrk, kill him with a counterattack or use to kill him, he won't transform. If you use a Soft on Alte Roite, it seems he is cursed with a petrified spine; he'll return the favor by healing himself completely, then go on attacking. Craziness! His Evasion and Magic Evasion is through the roof, as is his Magic Defense and, to a slightly lesser extent, his Defense.  Bio and Flare bunch through nicely, as does Holy. After 6000 HP...
Alte Roite reveals his true form!
Jura Avis 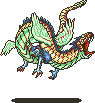 Boss Monster |
Type |
Level |
HP |
MP |
Gil |
EXP |
Speed |
Aevis | 61 | 15000 | 1000 | 0 | 0 | 40 | |
Strength |
Attack Mult. |
Magic Atk. |
Evasion |
Defense |
Mag. Def. |
Mag. Evade |
|
65 | 10 | 45 | 20 | 35 | 30 | 45 | |
Stolen Items |
Dropped Items |
||||||
Common: Dragon Fang | |||||||
Command Immunities | Elemental Immunities | ||||||
Catch, Control |  | ||||||
Elemental Absorb | Elemental Weakness | ||||||
    | None | ||||||
Blue Magic | Status Immunities | ||||||
None |  | ||||||
Strategy | |||||||
Unlike Alte Roite, Jura Avis is not Heavy, so the fight could end as quickly as you want it to. Otherwise, keep it paralyzed and slowed as much as possible. | |||||||
Blast, he became a lot harder. On the upside, he lost his Heavy nature, which is absolutely the path to his destruction. You want this thing to appear because it has a rare
 Dragon Lance for you. The Dragon Lance is the strongest Lance in the game, and is the key to the defeat of some very nasty critters. You can also get them later in a random encounter, but this thing is here now! His many HP-based attacks are a pain, but you can keep him busy with Paralyze: Whips and the Remora summon help out there, as well as MindBlst.
  Slow also helps. Since his level is 61, the BlakShok/L5 Doom combo works; but, since he isn't Heavy anyway, you might want to forego this bothersome technique and just cast X-Zone or summon Odin instead.
Obtaining a
Dragon Lance is very nice, especially if you plan on defeating the Magic Pot and that Gogo fella later. However, with every Reset spell you cast, you'll have to plow through another old man; waiting for the CrystlDrgn later may provide for quicker farming.The three old men in the bottom jail cell were running around a chest containing a
Prism Dress; the three old men in the other one guarded some Red Shoes.Now that you have all the
Dragon Lances you'll ever need (or not), walk to the left. There's a chest there you can't reach yet, but there's also Azulmagia waiting for you. The towering fiend is optional, but nets you a new item and a Save Point, so why not? He's a righteous detective, this one, inquiring into your business like a noisy no-good. Good boys don't lie, but good guys also get punished in the Dimension Castle. Proclaim your heroism and face Azulmagia, monstrous mage of the Eleven of the Rift.Azulmagia  Boss Monster |
Type |
Level |
HP |
MP |
Gil |
EXP |
Speed |
None | 57 | 27900 | 50000 | 0 | 0 | 45 | |
Strength |
Attack Mult. |
Magic Atk. |
Evasion |
Defense |
Mag. Def. |
Mag. Evade |
|
65 | 21 | 50 | 10 | 30 | 70 | 50 | |
Stolen Items |
Dropped Items |
||||||
Common: Black Hood | |||||||
Command Immunities | Elemental Immunities | ||||||
Catch, Control | None | ||||||
Elemental Absorb | Elemental Weakness | ||||||
None |  | ||||||
Blue Magic | Status Immunities | ||||||
  | |||||||
Strategy | |||||||
This guy does nothing but cast blue magic, and he knows virtually all of it. There are a few spells you can teach him, though, and if you do, he will then use them back on you. This works the best with L3 Flare assuming that you have a party who can not be hit by it. Use Guardian, Haste2, and Shell for defense. | |||||||
Azulmagia uses Blue Magic, and I mean a lot. Like, all the time. He's telling us he can quit whenever he wants, but we can tell he's not too sure himself anymore. Azulmagia lacks a few Blue spells, though! Azulmagia doesn't know and doesn't care about either
MoonFlut or Pep Up. The attacks Aero3, BlowFish, L3 Flare, AquaRake, MagHammr and Exploder, however, are Blue spells Azulmagia never got his ginormous hands on that he'd be more than happy to test out on you should he learn them in the course of the battle.When you use any of those Blue spells on him, he'll learn them from you and change his AI script accordingly. This is a lot of information, but it's really pretty interesting that he's set up to run this way.
Normal AI Script:
- First Set:
- Second Set:
- Third Set:
- Fourth Set:
- Fifth Set:
- Sixth Set:
Learned
L3 Flare! - First Set:
- Second Set:
- Third Set:
- Fourth Set:
- Return to normal AI Script
Learned
Aero3! - First Set:
- Second Set:
- Third Set:
- Fourth Set:
- Return to normal AI Script
Learned
BlowFish! - First Set:
- Second Set:
- Third Set:
- Return to normal AI Script
Learned
Red Feast! - First Set:
- Second Set:
- Third Set:
- 66% Red Feast
- 33%
- 66%
- Return to normal AI Script
Learned
AquaRake! - First Set:
- Second Set:
- Third Set:
- Fourth Set:
- Return to normal AI Script
Learned
MagHammr! - First Set:
- Second Set:
- Third Set:
- Return to normal AI Script
Learned
Exploder!- Exploder (ashes to ashes, dust to dust)
Phew! I'm not normally a fan of direct AI transcript, but since you may want to learn a Blue spell or two here, the specific circumstances of their appearance may be relevant to you. Azulmagia's quite absent-minded, that much is true; when you teach one Blue spell followed by another Blue spell, you can then teach him the first Blue spell again! He'll regain his enthusiasm for the spell as well.
If your level allows you to dodge
L3 Flare, teaching him that spell is the safest option for you. If that is not a possibility, the MagHammr routine is also a great one. Aggravating Azulmagia into using Aero3 or Red Feast is a bad idea: Aero3 deals about 1800 damage, and Red Feast and the ???? spell in that list are very dangerous on a creatures with over 20000 HP. Another neat thing to consider is Rflect + L3 Flare; everything in that potential AI list except for Goblin Punch is Reflectable, L3 Flare hurts Azulmagia and BlakShok and Guard Off are super-duper when they connect on Azulmagia.People may tell you to use
Exploder to end the battle! Possible, it does work, but you'll lose out on ABP for a single character as Azulmagia will take a character with him.Azulmagia's has a lot of attacks, some of which are very dangerous. Throw up
Guardian and Haste2; Shell will reduce damage dealt and reduce the hit rate of status ailment spells as well. Cast MagHammr or possible L3 Flare, and the battle is yours. Bio spellblade is very powerful; Bio is not a very powerful spell, so that Poison-elemental weakness is much better exploited with Sorcerors. Set Bersrk for added effects; if you have one or two casters to heal and clear bad effects, possibly boost levels or stats through !Sing or !Mix, a Sorceror can take Azulmagia down by itself.Giant's Glove are a bit better than Kasir Knuckle for those not punching Barefist; they have better Defense, boost Stamina (for Regen) and protect against Mini. Oh, joy. They can only be equipped by Heavy Armor Jobs, and they decrease Agility and Magic Power by 5. They're unique though!There's a Save Point here now, so that's beneficial. Do your thing with it, then look around to see what's the buzz. If we are to continue, we'll have to get past the beholder, Catastroph. You can't open the door, but you may gaze into Catastrope's Evil Eye...
Catastroph  Boss Monster |
Type |
Level |
HP |
MP |
Gil |
EXP |
Speed |
None | 71 | 19997 | 19997 | 0 | 0 | 45 | |
Strength |
Attack Mult. |
Magic Atk. |
Evasion |
Defense |
Mag. Def. |
Mag. Evade |
|
67 | 18 | 20 | 15 | 40 | 20 | 20 | |
Stolen Items |
Dropped Items |
||||||
Common: Soft | |||||||
Command Immunities | Elemental Immunities | ||||||
Catch, Control | None | ||||||
Elemental Absorb | Elemental Weakness | ||||||
| None | ||||||
Blue Magic | Status Immunities | ||||||
None | | ||||||
Strategy | |||||||
Catastroph hates things that float and will try to pull them down to earth every turn so it can use an earth-based attack. Even having one floating party member will make him forget anything but pulling that member down, so if you cast Float before battle and then put on a Wall Ring you'll take absolutely no damage. Do this, as the Earthshaker attack is nasty and you don't want to see it, nor do you want to see its petrifying Evil Eye. | |||||||
Catastroph is not intelligent enough to put up a decent fight like, say, Azulmagia; C. packs the punch but doesn't know how to deliver it. He'll attack randomly with physical attacks, stare at you with his Evil Eye to set Petrify to a single target or use Earth Shaker to deal anywhere between 900 and 1100 damage across the board. He won't even counter stuff, but he will get mad at you if you cleverly avoid his Earth-based attacks with
Float. If you elect to do so, he'll stop attacking and use 100 Gs to pull you down to the castle's floors.So, you know, casting
Float every turn will have him use 100 Gs every turn, which would be useless to you except for the fact that you still have three other characters eligible for the dealing damage department. In addition, you could even set Float outside of battle, then waltz in there with Wall Rings; 100 Gs reflects, so you will have just won the battle right there, as Catastroph won't ever attack again unless you Dispel your own Reflect/Float status. It only takes a single character with the Wall Ring/Float thing to make Catastroph completely fixated on pulling him or her down, so the other three can use all those other Relics you like so much. Aegis Shields and Ribbons protect against Evil Eye, but if you let Catastroph attack, Evil Eye really isn't the worst of your problems; Earth Shaker is very powerful and can take you down fast unless you Cure3 or WhitWind it up every single turn following the move. Since Catastroph doesn't have any elemental weaknesses, crippling status immunities or exploitable properties to take advantage of, just throw out your most powerful attacks. His level is 71, so after a successful BlakShok he will become vulnerable to L5 Doom. Something to remember!
Look at that. Eye haven't seen such an easy fight in ages, but it's not polite to stare. Enough with the eye puns, it looks more like an evil spud anyway. Receive your reward from the girl. What's a girl like that doing in a place like this? Don't ask her, she'll think you're hitting on her. When you go up, you'll find yourself outside! If you let old man Ramuh wander the forests near Easterly all those chapters ago, you can find him here, outside, as the rarest encounter. Otherwise, a MithrlDrgn takes his place.
Find now the Fury; they are supermages that are able to cast two spells every turn; normally, they'll combine either
Doom, Bersrk or nothing with Stop, Drain or nothing. When alone, they get especially mad at you and combine either two top-tier black elemental spells or Mute, Toad or Mini with Comet, Slow2 or Bio. That's a lot of spells. They're weak to Water, so Leviathan is quite effective. They're Heavy, however, so there's no other easy way of getting rid of them. Mute, Doom and Break do work when Leviathan is not at your disposal, though. If you want more Hex Rings for who knows what, get 'em from these guys.Yojimbo's !Wring sets both Poison and Darkness: an annoying combo. It was supposed to set Paralyze, but it doesn't. These nuisances carry a
 Strato as a rare steal, which, despite being a stronger Katana than the Masamune lacks any special features. Set Mini or whatever, who cares how you beat them, anything goes.
Ignore the door you first see and walk over to the left wing of the Dimension Castle. You'll find yourself in an apparently featureless room, but Thieves know better: there's a passage to the right. Go in, follow the trail until you reach the hitherto unreachable chest containing a
Maneater. If you didn't use Thieves, these are a total of three Dancer-only pieces of equipment you see for the first time. Trace back your steps, and enter the second floor of the Dimension Castle.There are no random encounters here in the throne room, but, if you descend in the middle of the room, there will be random encounters in the staircase. Flip the switch to open the doors; these doors will be closed again once you leave this room, so, unless you forgot something on the other side, there's little point in going through the heavy wooden doors.
The throne has but a single seat... a lonely king, this castle has. If you try to go to the exit once, you'll be pulled onto the throne; try twice and Halycanos of the Questionable Gender appears to kill you. Well, you know, he/she tries. If you wanna be a smart-ass, cast the
Toad spell on all characters not equipped with a Ribbon or Genji Gloves. You'll understand how this helps out when the battle starts.Halycanos  Boss Monster |
Type |
Level |
HP |
MP |
Gil |
EXP |
Speed |
None | 97 | 33333 | 5000 | 0 | 0 | 40 | |
Strength |
Attack Mult. |
Magic Atk. |
Evasion |
Defense |
Mag. Def. |
Mag. Evade |
|
65 | 12 | 250 | 0 | 10 | 20 | 250 | |
Stolen Items |
Dropped Items |
||||||
Common: Elf Cloak | |||||||
Command Immunities | Elemental Immunities | ||||||
Catch, Control | None | ||||||
Elemental Absorb | Elemental Weakness | ||||||
None | None | ||||||
Blue Magic | Status Immunities | ||||||
None | | ||||||
Strategy | |||||||
Every offensive summon will result in a counter that will kill one of your party. The damage you will inflict is not worth this, so summon only Carbuncle. Watch out for Dispel, though, because every seventh turn results in a casting of Holy, and this too will kill any un-reflected characters unless you are also Shelled and have insanely high HP. | |||||||
The King-Queen of the Dimension Castle will start the battle with the Alcumia's Ribbit attack, toggling the Toad status on all party members. Those not protected by the
Ribbon or Genji Gloves will find themselves looking small, green and delicious in the eyes of the strange old men in Kelb (also, the French). Those who entered the fight as a frog will find themselves restored. Sweet!Halycanos will muck about for quite a few turns, using physical attacks and the odd buffs (
Haste or Shell), Reverse Polarity or Dispel. On every seventh turn, the boss will use a Holy spell cast at a single party member, which will kill the target if they are not using the Reflect status (it does about 9500 damage, or half that with Shell in place). After the Holy spell, Ribbit will be used again; Toads not cured from the first attack will now be restored (and vice versa). The last thing to know is that Halycanos hates third parties entering into the arena; Summon magic will be punished by Strong Fight, which kills a character.This is a simple battle.
Dispel can be used to remove Haste and Shell if they give you pain. Don't use Summon Magic. Halycanos does have an odd status vulnerability to Mini though, with a level of 97, it is almost impossible to set. Note that Strong Fight is not affected by Mini's debilitating effects. Another good option is using !Mix to put together an Eye Drop and a Dark Matter; the resulting Gloom Gas sets Darkness, which really hinders the physical onslaught. Silence can be set, but it lasts only a short while. Mute spellblade is an option, but not necessarily better than, say, Flare spellblade.With his/her
Holy spell being the only intimidating factor in the battle, you could summon Carbuncle to help out; since Halycanos is not the target of this summon spell, he/she won't counter. Black spells bouncing off four targets are always a sweet deal. Just be careful Dispel doesn't remove one of the four barriers.If you never got a
Lumino Staff, here's your chance. It's still obtainable if you neglect to pick it up here, but waiting for the rarest encounter to drop a rare drop is not a lot of fun. The Aegis Shield is a great thing to have!Behind the throne room, there is a back room containing only some stairs leading to the top of the castle. There's a unique encounter pattern, though! At the top of the Dimension Castle, the last guardian between you and the Void will make itself known; Twin Tania, the most terrible weapon of mass destruction the Void has ever sealed within.
Twin Tania  Boss Monster |
Type |
Level |
HP |
MP |
Gil |
EXP |
Speed |
Magic Beast | 39 | 50000 | 10000 | 0 | 0 | 35 | |
Strength |
Attack Mult. |
Magic Atk. |
Evasion |
Defense |
Mag. Def. |
Mag. Evade |
|
90 | 14 | 7 | 0 | 30 | 16 | 7 | |
Stolen Items |
Dropped Items |
||||||
Common:  Tinkerbell Tinkerbell | |||||||
Command Immunities | Elemental Immunities | ||||||
Catch, Control | None | ||||||
Elemental Absorb | Elemental Weakness | ||||||
None |   | ||||||
Blue Magic | Status Immunities | ||||||
| |||||||
Strategy | |||||||
Twin Tania is another monster with two forms that are visually identical. The first starts the battle, and the second appears when charging Gigaflare. The second one lacks Heavy, so you can end the battle right there. If you want the steal and drops from it, though, you'll need to survive it either by having massive HP or Shell status, or by turning Twin Tania into a toad. | |||||||
Twin Tania is an outright jerk. He'll attack with several powerful multi-target attacks, so I'll begin with those. Wind Slash and Atomic Ray aren't that powerful, so forget about them.
MindBlst is a neat trick of Twin Tania's; unlike any other foe or character in this fine game, he can multi-target the thing, setting Paralyze to all four characters (unless protected by Genji Gloves or Winged Shoes). Ice Storm is just powerful stuff in general. He'll start with two turns of either Atomic Ray, Ice Storm or a physical. Then, he'll use multi-target MindBlst, followed by two turns of Wind Slash. After this, he will charge Gigaflare, but I want to talk about his counters first.Twin Tania may counteract any magical attack (this means anything coming from The !Red, !White, !Black, !Time, !Blue or !Summon classes) with Mega Flare; any other attack can provoke a 33% shot at Tidal Wave, which deals impressive Water-elemental damage.
Coral Rings, unsurprisingly, help out against this move.Book of Magic, Volume 14: "The secret of Gigaflare... When storing power for this magic, you become utterly defenseless for a moment... Casters, be wary."
When Twin Tania starts going for Gigaflare, he'll change into another monster.
First off, note that Twin Tania became vulnerable to instant death through Holy spellblade, Odin's Zantetsuken,
Doom spells, X-Zone spells, DoomClaw, the works. In addition, Toad can be set! Since Twin Tania also changes his drop and steal items, there's something to consider. The normal Twin Tania may rarely drop a Tinkerbell: it's the only one in the game, so you'll likely salivate all over the idea of getting one even though it's not very good. It's also likely, however, you'll want that second Double Axe, what with it being only the second Double Axe in the game! So, ideally, you'll want to a) have Twin Tania change form and steal a Double Axe b) survive Gigaflare somehow c) kill the normal Twin Tania and hope for a Tinkerbell.So, how to survive Gigaflare? You can set Toad, which causes Gigaflare to do nothing. After another turn, Twin Tania's normal sprite will suddenly appear in place of the frog; this signals the normal Twin Tania's return. Kill with the usual violence.
If you can set Shell and take a punch of about 1550 HP on one or more characters, you can survive Gigaflare straight up; Giant Drink may help out if it's necessary. Without Shell, Gigaflare deals over 3000 HP damage, which is too much for you (unless, again, Giant Drinks).
When fighting Twin Tania, keep on the defensive on the first two turns, as Ice Storm is quite powerful and there is no need to swallow a Tidal Wave or Mega Flare. When Twin Tania begins signaling the Gigaflare attack, Steal! Before either setting Toad or bracing for impact, whichever option you chose. When the normal Twin Tania is back, pound it for the sake of justice (also, possibly a
Tinkerbell).Since Twin Tania is weak to both Water and Holy, damaging him needn't be a chore; your best bet is probably summoning Carbuncle and spamming spells. If he counters with Megaflare, he'll just hurt himself (Megaflare is deflectable). Another option is equipping
Coral Rings across the board and going with anything other than spells; you'll keep yourself healed throughout the fight due to Twin Tania's torrents.How about a few notes on the
Tinkerbell? The Earth Bell functions like a Back Row OK Hammer, the Rune Bell like a Rune weapon (such as the Rune Edge). The Tinkerbell is the only other bell besides the Diamond one that actually functions as a bell; it deals unblockable, non-elemental magical damage from the Back Row and doesn't function when Mute (but not pre-set Mute) is in effect. There you go. Feel happy with it? You're not using Geomancers, it's not powerful and it doesn't aid in spellcasting, so nobody wants to hold it.When you're done, walk on up and scroll on down to read the final chapter of this long and epic struggle.
Caves of Narshe: Final Fantasy V
Version 6
©1997–2026 Josh Alvies (Rangers51)
All fanfiction and fanart (including original artwork in forum avatars) is property of the original authors. Some graphics property of Square Enix.
Version 6
©1997–2026 Josh Alvies (Rangers51)
All fanfiction and fanart (including original artwork in forum avatars) is property of the original authors. Some graphics property of Square Enix.