Final Fantasy IV Walkthrough
Written by Sabin
Contributor
36. Rotten to the Core
| Enemies: | Red D., Blue D., Behemoth, EvilMask, Breath, Mind, PinkPuff, Ogopogo, Zemus |
| Treasures: |
Get used to holding down L and R to run away. The monsters here are extremely difficult. So difficult, in fact, that all battles are played with the boss music. It's so difficult that the easiest enemy you'll encounter is a Behemoth. That's right, he's the easiest. So do yourself a favor, do like the Flock of Seagulls song and run so far away. The only good this area serves is if you need to do some massive leveling before Zemus.
Anyway, you'll notice you're now in a crystalline-type atmosphere. Head to the right and down the stairs. Go all the way to the left to find the next set of stairs and a treasure chest. Go down the stairs and the right. You'll notice two ways to go. Going right leads onward. Going down leads you up to an altar with a sword hovering over it. You should know that this is another optional boss. The treasure you get is Edge's ultimate main-game weapon, well worth it, believe you me. So put your dukes up and take what's coming to you.
Ogopogo  | Type | HP | GP | EXP | Attack | Hit % | |
None | 37000 | 0 | 61100 | 150 | 99 | ||
Magic Atk. | Speed | Defense | Evade % | Mag. Def. | Mag. Ev. % | ||
127 | 38 | 4 | 55 | 40 | 50 | ||
Level | Stolen/Dropped Items | Dropped Item % | |||||
62 | None | 0 | |||||
Added Attack Properties | Status Immunities | ||||||
None | None | ||||||
Elemental Absorb | Weakness | ||||||
None | None | ||||||
Strategy | |||||||
As a result of him being a palette swap of Leviathan, he has one of his same moves. And, even better, you get to see it right away! Before you can make a move, he lambastes you with, not one, but two Big Wave spells. That takes a good chunk of HP away from everyone. On top of his dual Big Waves, he also can use Big Wave just once, and also a fairly strong physical attack. Be careful when using magic here. This guy counters just about every offensive magic spell with something. He counters any offensive black, white, or ninja magic with Weak, a move that, by name, weakens your character to very low HP. He also counters any offensive attacking summon with Blaze, a fire attack that gets everyone. Edge will strike with his physical attack, as will Cecil. Kain will Jump. Rosa is going to be the quintessential healer, throwing around | |||||||
If you're anything like me, after a battle of that magnitude, you're going to want to run back to the save point to heal up and save it so you won't have to do that battle again. At any rate, head down the stairs into the next room. Head to the right and down the stairs. Snag the treasure. Find the next stairs and go down them. Grab the treasure and head to the right until you find a transporter. Head down the stairs to find another treasure. There's another set of stairs to go down. Run to the left to find another treasure. Snag it and then head down and the right. You'll find another transporter. This is the final floor. Run to the left and down the stairs. Run to the right and down the stairs. Run to the left to find the transporter. Easy enough. Now, it's time for some (optional, thank goodness) fun!
The PinkPuff Escapade
This is the one aspect of the game that has driven many gamers insane trying to accomplish, yours truly included. If accomplished, though, this quest will get you the most helpful piece of equipment in the game, by far. So much so that Zemus' best move becomes as ineffective as a toothpick against a tank for one of your party members.
Where you want to be is on B5 of the moon's core, so you're headed back up a level or two. You're in the right room if it's the one where you earlier nicked a
If you are lucky enough to have a
Congratulations, you have just received the
The Final Battle
Now, continuing on, with or without your awesome armor... the next room you see, as you go up the stairs, you'll find FuSoYa and Golbez confronting Zemus.
When you gain control, get ready for the fight of your life.
Zeromus  | Type | HP | GP | EXP | Attack | Hit % | |
None | 61000 | 0 | 0 | 174 | 99 | ||
Magic Atk. | Speed | Defense | Evade % | Mag. Def. | Mag. Ev. % | ||
32 | 69 | 1 | 90 | 17 | 60 | ||
Level | Stolen/Dropped Items | Dropped Item % | |||||
96 | 0 | ||||||
Added Attack Properties | Status Immunities | ||||||
None | None | ||||||
Elemental Absorb | Weakness | ||||||
None | None | ||||||
Strategy | |||||||
Enjoy this battle. It is indeed the final battle of the storyline, so have fun with it. First things first, you can't battle Zeromus unless you have Cecil use the Zeromus' moves are plentiful. His most prolific move is Big Bang, a large electric attack that destroys a bunch of HP. Not only that, but your HP also ticks down little by little after the attack. This is the move you'll have to worry about the most. On top of that, he has a move called Black Hole. This takes away any and all status effects that anyone—you or he—has inflicted on them. Meaning if you had Cecil on Haste, there goes his Haste. If you had Zeromus on Slow, there goes his Slow. If Edge had reflect, there goes his reflect. If you've managed to turn Cecil into a giant, fire-breathing cheetah... you get the picture. He has a fairly strong physical attack. However, even though I say it's fairly strong, this is the worst move he has in his bag of tricks. Other moves you'll have to look out for are As for your how your characters should react to this behemoth of a boss, it's actually nothing new. Your plan should be inflicting lots and lots of damage while keeping everyone alive. Easier said than done, believe me, I know. Cecil is going to strike with his sword. Kain is going to use Jump. Edge will use his Throw command. Throw anything and everything you have for some heavy damage. When you're out of things to throw, have him use his physical attack. Rosa is going to keep everyone's HP up, obviously. Rydia also becomes a secondary healer. If additional healing or reviving is necessary, have her summon | |||||||
Zeromus 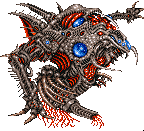 | Type | HP | GP | EXP | Attack | Hit % | |
None | 65000 | 0 | 0 | 32 | 85 | ||
Magic Atk. | Speed | Defense | Evade % | Mag. Def. | Mag. Ev. % | ||
0 | 53 | 0 | 0 | 0 | 0 | ||
Level | Stolen/Dropped Items | Dropped Item % | |||||
47 | 0 | ||||||
Added Attack Properties | Status Immunities | ||||||
None | None | ||||||
Elemental Absorb | Weakness | ||||||
None | None | ||||||
This battle will take a bit of time for success. It may take a bunch of tries as well. If you keep losing and get frustrated, take on some of the tough foes in the moon core to get leveled up. Then take another crack at it. If you gain two levels at a time per every two times you get beaten by Zeromus, you should see noticeable results every time. It may take some time. But when you see that first blast across the screen signifying his demise, you'll feel like a million bucks as you watch him slowly disintegrate.
After the battle, lean back and watch how it ends. You earned it.
Chapters | |||
Caves of Narshe: Final Fantasy IV
Version 6
©1997–2026 Josh Alvies (Rangers51)
All fanfiction and fanart (including original artwork in forum avatars) is property of the original authors. Some graphics property of Square Enix.
Version 6
©1997–2026 Josh Alvies (Rangers51)
All fanfiction and fanart (including original artwork in forum avatars) is property of the original authors. Some graphics property of Square Enix.